
This week, instead of sharing what I’ve been up to in the kite room, I want to detail a kite that I’m especially fond of.
While most of the kites that I make and share are either traditional shapes, or very close to them, I learned from a couple of friends (some years back) that nearly anything framed with 3 sticks can be persuaded to fly. Scott Skinner and Jose Sainz are brilliant kite makers, and if you ever have the opportunity to take their class on 3 stick kites, I think it will be time well spent.
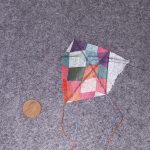
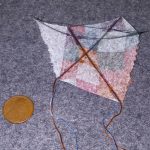
The 3 stick concept is wonderful, especially at the miniature scales, where I’m a little more willing to throw materials away after a failed experiment. Also, if I’m going to play with shapes, I love to explore asymmetry.
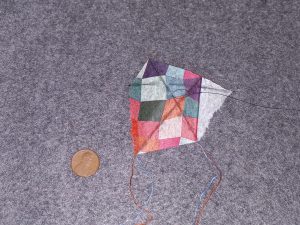
Since this particular print has so much going on visually, I thought that it would be fun to continue the deviation from symmetry that I started with the frame to the graphic layout of the sail. Since the napkin is not printed on all the folds, it allowed me to have a large negative space off to one side, while the crazy color blocking dominates the sail.
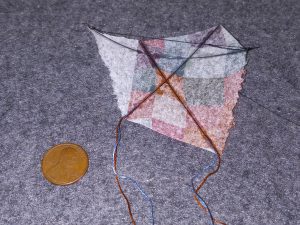
As if the fun with the shape was not enough, I decided that tearing two of the edges, instead of having the nice clean cuts that I have on most of the traditional shapes, would be good for this project.
At this point, with so many uncertainties, I chose to use more tails than I ordinarily would . This gives me more possibilities for matching the colors in the tail to those in the sail, but also gives me more drag for the sake of stability. Also in the pursuit of reliable flight, I left the tails looping from one stick across the kite to another.
As I really don’t know the kiting knowledge of the folks that may eventually handle the kite, I put a line across the back of the kite that is already tied at a good place to bow the sail backward to handle the air appropriately. Despite the odd shape of this project it only requires the one bow line, although I have made some that use two.

With the sail, structure, and tails settled, the only remaining step is attaching the flying line. A traditional shape will have the attachment in a specific space along the spine, but with an asymmetrical sail I had the challenge of sorting out the right spot and used some trial and adjustment before I secured the line to the sail.
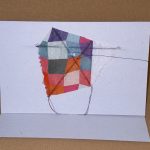
Once mounted on the card, the kite was mailed out with some thanks for inspiration.
While I have plenty more of the napkin that this kite was made from, it will be the only one that I make that has its precise features and shape. I intend to revisit some of the ideas, but that will require taking time away from other projects.
In the meantime check out the shop to see what kites are currently available to be mailed, or what you can get through a back order.